Display a section
We offer three ways to display a section which should cover all the different cases.
Global Sections
Global Sections are used to display the same content across an entire site and are useful for elements like header, footer and nav elements.
Any section can be used as a Global Section by use of the global_section Liquid tag. Global Sections are best used on layout pages that other pages inherit from. The content of a Global Section will be shared across all pages that contain the global_section tag (or inherit from a page that contains the global_section tag).
Example
{% global_section nav %}

{% sections_dropzone %}

{% global_section footer %}
Global Sections will be displayed on all relevant pages (pages on which the global_section tag has been placed or pages that inherit from such pages) in the Back Office page editor. An update to a Global Section on any of these pages will automatically apply to all pages that include that Global Section.
By default, Global Sections will appear at the top of the list of sections in the Back Office page editor. This behaviour can be changed via the placement parameter which is set on the global_section tag.
Example
{% global_section nav, placement: 'top' %}

{% sections_dropzone %}

{% global_section footer, placement: 'bottom' %}
Theplacementparameter controls the display position of a Global Section in the Back OfficeIt may seem unintuitive to control the position of a section in the Back Office via a Liquid tag parameter on a page. However, remember that the same section can be used as a Global Section and a Standalone Section and a Section in a DropZone.
Setting the
placementparameter on theglobal_sectionLiquid tag (as opposed to defining placement in the section definition) means that it only affects the instances of the section that are being used globally.
Defining content in Wagon
The content comes from the global_content property in your section definition. global_content is an alias for the default property.\
Standalone sections
Sometimes, because of how the design of the site has been thought, it doesn't really make sense to let the users add or remove sections.
That's why we provide the section Liquid tag.
Example
<div class="left-column">
  {% section photo_gallery %}
</div>
<div class="right-column">
  {% section text_image %}
  {% section form %}
</div>
You can call the same section multiple times in a pageJust simply pass an unique identifier to the
sectiontag. Ex.:{% section gallery, id: 'another_gallery' %}
Defining content in Wagon
In the YAML part of your page, just add the sections_content property. This property stores the content of your standalone sections in a JSON object. The keys are the ids of your sections.
sections_content:
  fancy:
    settings:
      greeting_word: Salutation
      avatar: "/samples/avatar/gentleman"
    blocks:
    - type: person
      settings:
        name: sir
sections_content: >
{
"fancy": {
"settings": {
"greeting_word": "Salutation",
"avatar": "/samples/avatar/gentleman"
},
"blocks": [
{
"type": "person",
"settings" {
"name": "sir"
}
}
]
}
}Sections in a dropzone
Here lies the true power of sections!
To let your users add, remove, update and re-order sections in a page, just add the sections_dropzone Liquid tag in the template of your page.
In the editor UI, this will display a widget allowing your users to easily manage the sections.
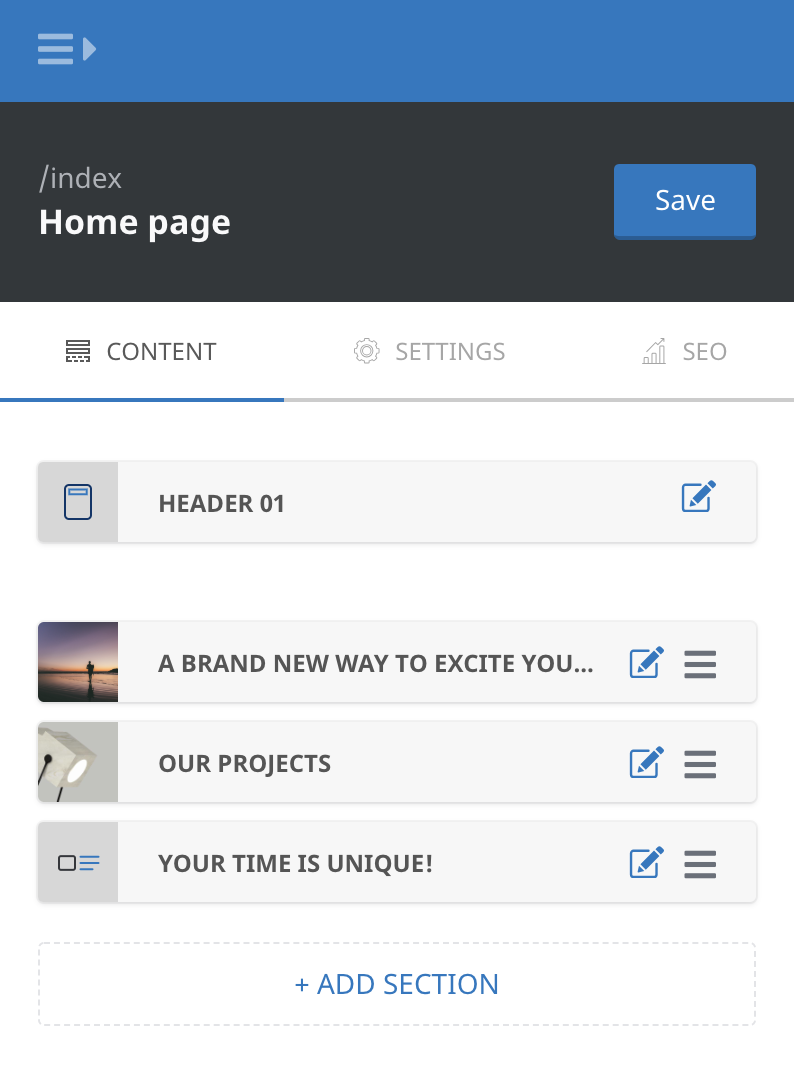
Only sections which own a presets attribute will be available within the sections_dropzone
dropzone_presetsis an alias forpresets.
Example
<div class="page-sections">
  {% sections_dropzone %}
</div>
Defining content in Wagon
If there is no sections_dropzone_content property in your YAML header, no sections will be displayed within your sections_dropzone Liquid tag.
The sections_dropzone_content YAML attribute is a JSON array of objects. Each object owns 3 attributes: type, settings and blocks.
---
sections_dropzone_content:
  - type: simple_slider
    settings: {}
    blocks:
    - type: slide
      settings:
        title: A brand new way to excite <br/>your audience
        description: Who can visualize the sorrow and mineral
        image: slide1.png
    - type: slide
      settings:
        title: A meaningless form of vision is the uniqueness!
        image: slide2.png
  - type: our_work
    settings:
      title: Our projects
      description: Play with colors, animations and content.
    blocks:
    - type: list_item
      settings:
        title: 'Item #1'
        image: "/samples/products/grid-1.jpg"
    - type: list_item
      settings:
        title: 'Item #2'
        image: "/samples/products/grid-2.jpg"
---
sections_dropzone_content: >
[
{
"type": "simple_slider",
"settings": {},
"blocks": [
{
"type": "slide",
"settings": {
"title": "A brand new way to excite <br/>your audience",
"description": "Who can visualize the sorrow and mineral",
"image": "slide1.png"
}
},
{
"type": "slide",
"settings": {
"title": "A meaningless form of vision is the uniqueness!",
"image": "slide2.png"
}
}
]
},
{
"type": "our_work",
"settings": {
"title": "Our projects",
"description": "Play with colors, animations and content."
},
"blocks": [
{
"type": "list_item",
"settings": {
"title": "Item #1",
"image": "/samples/products/grid-1.jpg"
}
},
{
"type": "list_item",
"settings": {
"title": "Item #2",
"image": "/samples/products/grid-2.jpg"
}
}
]
}
]
---Section wrapping
LocomotiveCMS wraps sections when rendering the HTML. Depending on which Liquid tag you use to display your sections, LocomotiveCMS will use different strategies to wrap them.
In case of the sections_dropzone tag, two layers of DIV elements will be rendered:
- A single outer DIV will wrap all sections and will have
locomotive-sectionsapplied as the value in its class attribute. - Within this, each section will be wrapped in its own individual DIV tag with
locomotive-sectionapplied as the value in its class attribute, as well as any values provided in theclassattribute in the section definition. The id attribute of the DIV will be renderedlocomotive-section-dropzone-with name of the section (or its id) appended. A data attribute,data-locomotive-section-type, will also be applied to this element.
Standalone and global section tags will only be wrapped within the individual DIV tag described above, with locomotive-section applied as the value in its class attribute, as well as any values provided in the class attribute in the section definition. The id attribute of the DIV will be rendered locomotive-section- with name of the section (or its id) appended.
<!-- Sections rendered by the {% sections_dropzone %} tag -->

<!-- Single outer div -->
<div class="locomotive-sections">

    <!-- For each section rendered... -->
    <div id="locomotive-section-dropzone-x" class="locomotive-section [values provided in the class attribute of the section definition]" data-locomotive-section-type="[section slug]">

        <!-- Content of individual section -->

    </div>
</div>
<!-- Single Div -->
<div id="locomotive-section-standalone" class="locomotive-section [values provided in the class property of the section definition]" data-locomotive-section-type="standalone">
<!-- Content of section -->
</div>
Overriding section DIV elementsIt is possible to override the automatically generated individual DIV wrapper by including it in the section Liquid template. In this case, you must provide the necessary id, class and data attributes. For example:
<section id="{{ section.anchor_id }}" class="{{ section.css_class }}" {{ section.locomotive_attributes }}>Note: In this example the DIV element has been replaced with a SECTION element. The id, class and data attributes have been provided via the
{{ section.anchor_id }},{{ section.css_class }}and{{ section.locomotive_attributes }}tags, respectively. Additional values could be applied to the class attribute if desired.
Block Nesting
Section blocks can be nested when the attribute blocks_display is set to tree and attribute block_max_length is set above the default 0.
LocomotiveCMS will automatically handle the UI of block nesting in the back-office editor. Blocks can be nested simply by dragging a block to the right and dropping it under an intended parent block.
Section Liquid templates, on the other hand, require specific setup to display nested blocks. The default for block in section.blocks must be replaced with for block in section.blocks_as_tree and conditional statements must be added to check whether a block has_leaves?, i.e. whether the block has other blocks nested beneath it.
A picture paints a thousand words, but in this case, code...
Example
{% for block in section.blocks_as_tree %}

    {% if block.type == 'container' %}

        <div class="flex-container">

            {% if block.has_leaves? %}

                {% for _block in block.leaves %}

                    {% if _block.type == 'item' %}

                        <div class="flex-item">

                            {% if _block.has_leaves? %}

                                {% for __block in _block.leaves %}

                                <!-- etc, etc -->

                                {% endfor %}

                            {% endif %}

                        </div>

                    {% endif %}


                {% endfor %}

            {% endif %}

        </div>

    {% endif %}

{% endfor %}
The above example is a very simple one. In practice, it will likely be more managable to use snippets for each block type. Snippets can be used recursively if blocks are passed using the with parameter, e.g. {% include 'block-item' with: block: _block %}.
Updated 8 months ago